BloxdHub may add new features or sections; check announcements regularly.
New features may have temporary rules or guidelines—follow them.
11
FAQs
How do I post a mod? → Use the Mods section, add description & images.
How do I report a post? → Click the report button on the post, explain why.
Where do I ask for coding help? → Use the Forums section.
Can I post my own schematics? → Yes, upload in Schematics with instructions.
How can I become a moderator? → Moderators are randomly selected based on activity and contributions. Be active, helpful, and follow the rules to increase your chances.
Note: Most of the features listed here are coming soon.
YouTuber Requirements
Eligibility
Minimum 500 subscribers.
Must post Bloxd-related content.
Monthly Promotion Options
Choose one of the following to qualify for the month:
Option 1
Upload 1 video per month with at least 20 seconds showing BloxdHub and include a link in the description to join.
The video must get 750+ views within the month.
Option 2
Upload 2 videos per month, each including at least 20 seconds of BloxdHub content and a link in the description.
Each video must get 400+ views.
If requirements are not met, your status will be removed until you meet them again.
Dedicated Video Option
Upload a dedicated video about BloxdHub and get 1500+ views within the month.
You will then qualify for 2 months of YouTuber status.
Benefits
YouTubers get a special name color and badge next to their name.
Series help organize your posts into collections, making it easier for followers to find related content.
Icon
Color
Add to Series
Choose a series for this post
Delete Series?
Are you absolutely sure? This action cannot be undone.
Edit Post
2:00
0
Introduction to Bloxd API
5 min read Updated Dec 2025
Welcome to the Bloxd.io API documentation. This guide covers how to create custom game modes, mods, and interactive experiences using the Bloxd scripting system. You can run JavaScript that interacts with the game API.
Community Documentation
This is not official documentation. It's meant to be an additional resource to help developers. Information may occasionally be out-of-date.
Work in Progress
This documentation currently covers about 45-50% of the Bloxd API. We're actively adding more sections and examples. Any feedback or suggestions would be greatly appreciated!
Ways to Run Code
World Code
Press F8 to access. Runs when callbacks are triggered. Supports all callbacks. Limited to 16,000 characters.
Code Blocks
Found in creative menu. Runs when clicked or triggered by adjacent "press to code" board. Cannot use callbacks. 16,000 char limit each.
Code Boards
Begin text with "press to code" to run JavaScript on right-click. Limited text space - use Code Blocks for longer code.
What is World Code?
World Code is the main way to write game logic. Press F8 to open the World Code editor. Only world owners can edit it.
The World Code editor popup (opened with F8)
What are Code Blocks?
Code Blocks are physical blocks you can place in your world. Find them in the creative menu. Right-click to open the code editor.
A Code Block placed in the world
When you right-click a Code Block, you'll see the code editor. Notice the "World Code" button - this is another way to access World Code!
The Code Block editor - red arrows show the World Code button
Key Differences
Feature
World Code
Code Blocks
Boards
Callbacks
✓ Yes
✗ No
✗ No
Trigger
Callback events
Click/adjacent board
Right-click
Char Limit
16,000
16,000 each
Small
Access
F8 key
Creative menu
Place sign
myId variable
null
Player who clicked
Player who clicked
thisPos variable
null
Block position
Board position
Global Variables
myId - Player ID of who ran the code (null in World Code)
thisPos - Position of the code block/board (null in World Code)
api - Global object with all API methods
Useful Tips
Use api.log() or console.log() for debugging
Use Date.now() or api.now() for timestamps
Comments work: // comment and /* comment */
Variables declared with var are shared across World Code, Code Blocks, and Boards
Your First Script
5 min read Updated Dec 2025
Let's write your first script! We'll start super simple and build up from there.
Step 1: Open World Code
Press F8 in your world to open the code editor. That's it!
F8 Not Working?
Go to Settings → Controls → scroll down to "Open code editor" and set a new keybind.
api.applyImpulse() pushes an entity. The three numbers are X, Y, Z - so 0, 20, 0 pushes straight up!
Full Example
Here's everything together:
js
// Welcome new players
onPlayerJoin = (playerId) => {
    api.sendMessage(playerId, "Welcome! Type /jump to fly!");
}

// Handle commands
playerCommand = (playerId, command) => {
    if (command === "jump") {
        api.applyImpulse(playerId, 0, 20, 0);
        api.sendMessage(playerId, "Wheee!");
        return true;
    }
}
What's Next?
You just learned:
How to open World Code
What callbacks are (onPlayerJoin, playerCommand)
How to send messages and apply physics
Check out Events to learn about more callbacks, or Players API to see what else you can do with players!
Syntax Basics
8 min read Updated Dec 2025
This guide covers the fundamental syntax rules and symbols used in JavaScript for the Bloxd API. Understanding these basics is essential for writing functional code.
Prerequisites
No prior programming experience required. This guide explains each concept from the ground up.
Bracket Types
JavaScript uses three types of brackets, each serving a distinct purpose:
Symbol
Name
Primary Use
Example
( )
Parentheses
Function calls and parameters
api.sendMessage(playerId, "text")
[ ]
Square Brackets
Arrays and indexing
[1, 2, 3] or array[0]
{ }
Curly Braces
Objects and code blocks
{x: 10, y: 5}
Parentheses ( )
Parentheses are used to call functions and pass parameters. When calling a function, parameters are enclosed in parentheses and separated by commas.
js
// Function call with two parameters
api.sendMessage(playerId, "Hello");

// Function call with three parameters
api.setBlock(10, 5, 20, 1);

// Function call with no parameters
api.now()

// Function definition
onPlayerJoin = (playerId) => {
    // Function body
}
Rules:
Parameters are separated by commas
Opening and closing parentheses must match
Empty parentheses () are required even with no parameters
Square Brackets [ ]
Square brackets define arrays (ordered lists) and access array elements by index. Array indices start at 0.
js
// Array declaration
let numbers = [5, 10, 15, 20];
let colors = ["red", "blue", "green"];

// Array access (zero-indexed)
let first = colors[0];   // "red"
let second = colors[1];  // "blue"
let third = colors[2];   // "green"

// Array of player IDs
let team = [player1, player2, player3];
Rules:
Elements are separated by commas
Index counting starts at 0, not 1
Use [index] to access specific elements
Zero-Based Indexing
Arrays use zero-based indexing. The first element is at index 0, the second at index 1, and so on.
Curly Braces { }
Curly braces serve two purposes: defining objects with key-value pairs, and grouping multiple statements into code blocks.
Objects
Objects store data as key-value pairs. Keys and values are separated by colons, pairs are separated by commas.
js
// Object declaration
let player = {
    name: "Steve",
    health: 20,
    team: "red"
};

// Accessing object properties
api.sendMessage(playerId, player.name);    // "Steve"
api.sendMessage(playerId, player.health);  // 20

// Position object
let position = {
    x: 10,
    y: 5,
    z: 20
};
Rules:
Format: key: value
Pairs separated by commas
Access properties using dot notation: object.key
Code Blocks
Curly braces group multiple statements that should execute together, such as in functions or conditional statements.
js
// Function body
onPlayerJoin = (playerId) => {
    api.sendMessage(playerId, "Welcome!");
    api.setHealth(playerId, 20);
}

// Conditional block
if (command === "heal") {
    api.setHealth(playerId, 20);
    api.sendMessage(playerId, "Healed!");
}
Rules:
Opening brace { begins the block
Closing brace } ends the block
All statements within execute as a unit
Indentation improves readability
Assignment vs Comparison
The number of equals signs determines the operation: assignment or comparison.
Operator
Operation
Description
Example
=
Assignment
Assigns a value to a variable
let x = 10;
===
Strict Equality
Checks if values are equal
if (x === 10)
!==
Strict Inequality
Checks if values are not equal
if (x !== 10)
Common Error
Using = instead of === in conditional statements is a frequent mistake. Single equals assigns a value, triple equals compares values.
js
// Assignment
let health = 20;
let name = "Steve";
let isAlive = true;

// Comparison
if (command === "heal") {
    // Executes if command equals "heal"
}

if (health !== 0) {
    // Executes if health is not 0
}

// Incorrect - assigns value instead of comparing
if (command = "heal") {  // Wrong

// Correct - compares values
if (command === "heal") {  // Correct
Whitespace
Whitespace (spaces and line breaks) does not affect code execution but improves readability. Follow these conventions:
Add Spaces:
js
// After commas
api.sendMessage(playerId, "Hello");

// Around operators
let x = 10;
if (x === 10) { }

// After keywords
if (health > 0) { }
Avoid Spaces:
js
// Incorrect - spaces inside parentheses
api.sendMessage( playerId, "Hi" );

// Correct - no spaces inside parentheses
api.sendMessage(playerId, "Hi");

// Incorrect - space between function name and parentheses
api.sendMessage (playerId, "Hi");

// Correct - no space between function name and parentheses
api.sendMessage(playerId, "Hi");
Semicolons
Semicolons mark the end of statements. While optional in JavaScript, they improve code clarity and prevent potential issues.
js
// With semicolons (recommended)
let x = 10;
api.sendMessage(playerId, "Hi");

// Also valid without semicolons
let x = 10
api.sendMessage(playerId, "Hi")

// Do not use semicolons after closing braces
if (x > 5) {
    api.log("Greater");
}  // No semicolon

onPlayerJoin = (playerId) => {
    api.log("Joined");
}  // No semicolon
Rule: Use semicolons at the end of statements that do not end with a closing brace }
Complete Example
This example demonstrates all syntax concepts in a functional team system:
js
// Array to store team members
let redTeam = [];

// Function triggered when player joins
onPlayerJoin = (playerId) => {
    // Add player to team array
    redTeam.push(playerId);

    // Send message using parentheses
    api.sendMessage(playerId, "Welcome to Red Team!");

    // Set player health
    api.setHealth(playerId, 20);
}

// Function triggered by player commands
playerCommand = (playerId, command) => {
    // Compare command using ===
    if (command === "team") {
        // Get array length
        let teamSize = redTeam.length;
        api.sendMessage(playerId, "Red team has " + teamSize + " players");
        return true;
    }
}
Common Errors
Incorrect
Correct
Issue
if (x = 5)
if (x === 5)
Assignment instead of comparison
let list = (1, 2, 3)
let list = [1, 2, 3]
Wrong bracket type for arrays
api.sendMessage[playerId]
api.sendMessage(playerId)
Wrong bracket type for function calls
if (x > 5) { };
if (x > 5) { }
Unnecessary semicolon after brace
let info = [name: "Bob"]
let info = {name: "Bob"}
Wrong bracket type for objects
Quick Reference
Symbol
Use Case
Example
( )
Function calls
api.sendMessage(playerId, "text")
[ ]
Arrays
let list = [1, 2, 3]
{ }
Objects
let obj = {x: 10, y: 5}
{ }
Code blocks
if (x > 5) { code }
=
Assignment
let x = 10
===
Equality check
if (x === 10)
!==
Inequality check
if (x !== 10)
;
Statement terminator
api.log("text");
Next Steps
With these syntax fundamentals understood, proceed to the Events section to learn how to trigger code execution based on game events such as player joins, commands, and block interactions.
Events
5 min read Updated Dec 2025
Events let you run code when something happens in your world - like a player joining, chatting, or breaking a block.
How Events Work
Events are callbacks that run automatically when specific actions occur in your world. You define a function and assign it to an event name, and the game calls it with relevant data whenever that event triggers.
js
onPlayerJoin = (playerId) => {
    // This runs when someone joins
}
World Code Only
Events only work in World Code (F8), not in Code Blocks.
Think of events like setting up a doorbell. You don't stand at the door waiting all day - you set up a doorbell, and when someone presses it, it rings and you know to go answer.
Events work the same way. You write a function (your code), and the game automatically runs it when something specific happens - like a player joining, chatting, or breaking a block.
The stuff in parentheses like (playerId) are values the game gives you automatically. You don't have to figure out who joined - the game tells you by putting their ID in that variable.
The => arrow is just a way to write a function. Everything inside the curly braces { } is what happens when the event fires.
onPlayerJoin
Fires once when a player first connects to your world. Receives the player's ID. Perfect for welcome messages, giving starter items, or initializing player-specific data.
Welcome messages, giving starter items, initializing player data.
This event fires the moment someone enters your world. It only fires ONCE per player - when they first join, not every second they're in the world.
The playerId is like a unique name tag the game gives each player. You use this ID to do things TO that specific player - like sending them a message or giving them items.
This is perfect for welcome messages because you want to greet someone when they arrive, not randomly throughout their visit. You can also use it to give starter items, set up their player data, or announce to everyone that someone new joined.
onPlayerLeave
Fires when a player disconnects from your world, whether by leaving, closing their browser, or losing connection. Receives the player's ID. Use for saving data or cleanup.
js
onPlayerLeave = (playerId) => {
    let name = api.getEntityName(playerId);
    api.broadcastMessage(name + " left!");
}
When to use
Saving player data, announcing departures, cleaning up game state.
This fires when someone leaves your world - whether they clicked "leave", closed their browser, or lost internet connection.
You still get their playerId so you can do things like save their progress, announce they left, or clean up any game data related to them.
The let name = api.getEntityName(playerId) part gets their actual username (like "CoolGamer99") instead of the ugly ID. Then we use + to combine the name with our message text.
This is useful for goodbye messages, saving player data before they're gone, or updating scoreboards when someone leaves mid-game.
playerCommand
Fires when a player types a message starting with /. Receives the player ID and command text (without the slash). Return true to prevent "unknown command" error.
Player types /help, but command will be "help" (no slash).
When to use
Custom commands like /spawn, /heal, /kit, /stats.
When a player types something starting with / in chat (like /help), this event fires. The game strips the slash, so if they type /help, your command variable will just be "help".
The if (command === "help") checks if they typed exactly "help". The triple equals === means "is exactly equal to".
The return true at the end is important! It tells the game "I handled this command, don't show an error." If you don't return true, the player sees "Unknown command" even though your code ran.
You can add more commands by adding more if statements - one for each command you want to create like /spawn, /heal, /kit, etc.
onPlayerChat
Fires when a player sends a regular chat message (not a command). Receives player ID and message text. Return false to block the message from being sent to other players.
js
onPlayerChat = (playerId, chatMessage) => {
    if (chatMessage.includes("badword")) {
        api.sendMessage(playerId, "Watch your language!");
        return false;
    }
    return true;
}
This fires every time someone sends a regular chat message (not a /command). You get their playerId and the actual chatMessage they typed.
The .includes("badword") checks if their message contains that text anywhere. So "hello badword bye" would trigger it.
The return false is the magic part - it BLOCKS the message from being sent to everyone. The player typed it, but nobody else sees it. You can warn them privately with sendMessage.
If you return true (or don't return anything), the message goes through normally. This is great for chat filters, custom chat formatting, or chat-based minigames where typing certain words does something special.
tick
Fires continuously 20 times per second (every 50ms). Your main game loop for continuous checks and updates. Receives milliseconds since last tick. Keep code fast to avoid lag.
js
tick = (ms) => {
    // Runs every 50ms (20 times per second)
}
Keep it fast!
This runs 20x per second. Slow code here will lag your world.
When to use
Void death, zone checking, timers, continuous game logic.
Think of tick like a heartbeat for your world - it beats 20 times every second, forever, as long as your world is running.
The ms value tells you how many milliseconds passed since the last tick (usually around 50ms). You probably won't need this much.
This is your "game loop" - perfect for things that need to happen constantly, like checking if players fell into the void, running timers, or checking if players are in certain zones.
WARNING: Because this runs 20 times per second, any slow code here will lag your entire world! Keep tick code fast and simple. Don't do heavy calculations or loop through tons of data here.
onPlayerChangeBlock
Fires when a player places or breaks a block. Receives player ID, block coordinates, and what the block changed from/to. Return "preventChange" to cancel the action completely.
Build protection, block logging, special block effects.
This fires whenever a player places OR breaks a block. You get the exact coordinates (x, y, z) and what the block changed from and to.
fromBlock is what the block WAS before. toBlock is what it's becoming. When someone BREAKS a block, toBlock will be "Air" (because the block is now gone). When someone PLACES a block, fromBlock will be "Air" (because there was nothing there before).
The return "preventChange" is super powerful - it cancels the action completely! The block stays exactly as it was. Use this to protect certain blocks or areas from being changed.
Great for build protection (can't break blocks in spawn), logging who changed what, or making special blocks that do something when broken.
onPlayerJump
Fires every time a player presses the jump button. Receives the player's ID. Useful for double-jump mechanics, jump counters, or triggering abilities on jump.
Simple one - this fires every single time a player presses the jump button. You just get their playerId.
This is perfect for making custom jump mechanics like double-jump (track how many times they jumped, give them an extra boost), jump counters for minigames, or triggering abilities when jumping.
Note: This fires when they PRESS jump, not when they land. So even if they're in the air, pressing jump again will fire this event.
onBlockStand
Fires repeatedly while a player is standing on a block. Receives player ID, block coordinates, and block name. Fires very frequently (20-80 times per second), so use small damage values for damage zones.
js
onBlockStand = (playerId, x, y, z, blockName) => {
    if (blockName === "Lava") {
        api.applyHealthChange(playerId, -2);
    }
}
This fires repeatedly while a player is standing on top of a block. You get their position (x, y, z) and what block they're standing on (blockName).
Important: This fires VERY fast - potentially 20-80 times per second per player! So if you're dealing damage, use small amounts (like -2) or it'll kill them instantly.
The y coordinate is the block BELOW their feet. So if they're standing on lava at y=10, you get y=10 and blockName="Lava".
Perfect for: pressure plate effects, lava/poison damage zones, speed boost pads, checkpoint systems, or any "step on this block to trigger something" mechanic.
Quick Reference
Event
When it fires
onPlayerJoin
Player joins
onPlayerLeave
Player leaves
playerCommand
Player types /command
onPlayerChat
Player sends chat
tick
20 times per second
onPlayerChangeBlock
Block placed/broken
onPlayerJump
Player jumps
onBlockStand
Player stands on block
Messages
3 min read Updated Dec 2025
Send chat messages to players - privately or to everyone.
api.sendMessage()
Send a private message to a specific player. The message appears in their chat and only they can see it. Supports custom text styling and color options.
js
api.sendMessage(playerId, "Hello!");
When to use
Private notifications, command responses, warnings that only one player should see.
Example: Welcome message
js
onPlayerJoin = (playerId) => {
    api.sendMessage(playerId, "Welcome to my world!");
    api.sendMessage(playerId, "Type /help for commands");
}
Uses onPlayerJoin event to detect when someone joins. Sends two private messages to that player.
Think of this like sending a private DM or text message. Only that one person can see it - nobody else in the world will know you sent it.
The first thing you put in is playerId - this is like the phone number of who you're texting. You get this ID from events like when someone joins or types a command.
The second thing in quotes is your actual message - whatever text you want them to see in their chat.
api.broadcastMessage()
Send a message to all players in the world. Everyone sees the same message in their chat at the same time. Supports custom text styling and color options.
js
api.broadcastMessage("Game starting!");
When to use
Announcements, game events, player join/leave messages that everyone should see.
Example: Announce player joins
js
onPlayerJoin = (playerId) => {
    let name = api.getEntityName(playerId);
    api.broadcastMessage(name + " joined the game!");
}
Gets the player's name, then broadcasts to everyone. All players see "PlayerName joined the game!".
This is like making an announcement over a loudspeaker - EVERYONE in the world hears it at the same time.
Notice you don't need to say WHO to send it to (no playerId) because it goes to everybody automatically.
The + symbol joins pieces of text together. So if the player's name is "Steve", then name + " joined!" becomes "Steve joined!"
The let name = ... part creates a little storage box called "name" to hold the player's username so we can use it in our message.
Colored Messages
Add a style object as the third parameter to customize message appearance. You can change the color and font weight of messages.
The curly braces { color: "red" } are like extra settings you can add to your message.
You can use simple color names that everyone knows: "red", "green", "blue", "yellow", "orange", "purple", "white".
Or you can use hex codes like "#ff0000" for red or "#00ff00" for green if you want a specific shade. Google "hex color picker" to find codes!
This works on both sendMessage (private) and broadcastMessage (everyone) - just add the color part at the end.
api.getEntityName()
Get the in-game display name of a player or entity. Returns the username that players see, not the internal ID. Works on any entity, not just players.
js
let name = api.getEntityName(playerId);
api.broadcastMessage(name + " won the game!");
Players have two things: an ID (like "player_abc123") which the computer uses, and a NAME (like "CoolGamer99") which humans see.
You can't show the ID in chat because it looks ugly and confusing. This function converts the ID into their actual username that looks nice.
Always use this when you want to mention a player's name in any message!
api.getNumPlayers()
Get the total number of players currently in the world. Returns an integer count of all connected players.
js
let count = api.getNumPlayers();
api.broadcastMessage("Players online: " + count);
This gives you a number - how many people are in your world right now. If 5 people are playing, it returns 5.
You can use this to show player counts, or check if you have enough players to start a game (like "need 4 players to start").
Store it in a variable like let count = ... so you can use the number in messages or comparisons.
Player Info
3 min read Updated Dec 2025
Get information about players - who's online, their names, and how to find specific players.
api.getPlayerIds()
Get an array of all player IDs currently in the world. Returns a list you can loop through to do something to every player.
js
let players = api.getPlayerIds();
When to use
Looping through all players, checking everyone's position, applying effects to everyone.
Example: Heal everyone
js
playerCommand = (playerId, command) => {
    if (command === "healall") {
        let players = api.getPlayerIds();
        for (let p of players) {
            api.setHealth(p, 100);
        }
        api.broadcastMessage("Everyone healed!");
        return true;
    }
}
Gets all player IDs, loops through each one, sets their health to 100.
This gives you a list of everyone currently in your world. Think of it like getting a class roster - you get everyone's ID number.
The for (let p of players) part goes through the list one by one. For each person in the list, do something to them.
This is super useful when you want to affect EVERYONE at once - like healing all players, checking if anyone is in a zone, or giving everyone an item.
api.getEntityName()
Get the display name of a player or entity. Returns the username that players see, not the internal ID. Works on any entity, not just players.
js
let name = api.getEntityName(playerId);
When to use
Showing player names in messages, announcements, leaderboards, kill feeds.
Example: Announce joins
js
onPlayerJoin = (playerId) => {
    let name = api.getEntityName(playerId);
    api.broadcastMessage(name + " joined the game!");
}
Gets the player's username and broadcasts it to everyone.
Every player has two things: an ID (like "player_abc123") and a NAME (like "CoolGamer99").
The ID is what the computer uses internally - it's ugly and confusing for humans.
The name is what everyone sees - it's their actual username.
This function converts the ugly ID into the nice readable name. Always use this when you want to show a player's name in chat or on screen!
api.getPlayerId()
Find a player by their username. Returns their player ID if found, or null if no player with that name is online.
js
let playerId = api.getPlayerId("PlayerName");
When to use
Admin commands that target specific players by name, teleporting to a player.
Example: /tp command
js
playerCommand = (playerId, command) => {
    if (command.startsWith("tp ")) {
        let targetName = command.substring(3);
        let targetId = api.getPlayerId(targetName);

        if (targetId) {
            let pos = api.getPosition(targetId);
            api.setPosition(playerId, pos);
            api.sendMessage(playerId, "Teleported to " + targetName);
        } else {
            api.sendMessage(playerId, "Player not found!", { color: "red" });
        }
        return true;
    }
}
Takes player name from command, finds their ID, gets their position, teleports you there.
This is the opposite of getEntityName! Instead of ID → name, this goes name → ID.
You give it a username like "Steve", and it searches through everyone online to find that person's ID.
If they're not online, it returns null (nothing). That's why we check if (targetId) - to make sure we found someone before trying to use their ID.
Perfect for commands where players type someone's name, like "/tp Steve" or "/kick BadPlayer".
api.playerIsInGame()
Check if a player ID is still valid and connected. Returns true if the player is currently in the game, false if they left or the ID is invalid.
js
if (api.playerIsInGame(playerId)) {
    api.sendMessage(playerId, "You're still here!");
}
When to use
Checking if a saved player ID is still valid, verifying players before doing actions.
Sometimes you save a player's ID for later use. But what if they left the game? Their ID becomes invalid!
This function checks: "Is this player ID still good? Are they still connected?"
Returns true if yes (they're still playing), false if no (they left or the ID is bad).
Use this before doing something to a saved player ID to avoid errors.
api.isMobile()
Check if a player is on a mobile device or computer. Returns true for mobile/tablet, false for desktop.
js
if (api.isMobile(playerId)) {
    api.sendMessage(playerId, "Mobile controls enabled!");
}
When to use
Adjusting difficulty for mobile players, showing different instructions, mobile-specific features.
Example: Mobile tips
js
onPlayerJoin = (playerId) => {
    if (api.isMobile(playerId)) {
        api.sendMessage(playerId, "Tip: Use joystick to move!");
    } else {
        api.sendMessage(playerId, "Tip: Use WASD to move!");
    }
}
Shows different control tips based on whether they're on mobile or desktop.
Mobile players have touchscreen controls which can be harder than keyboard/mouse. This lets you detect which type of player they are.
You can use this to make your game more fair - like giving mobile players extra help, showing them different instructions, or adjusting difficulty.
It's a simple yes/no check: mobile = true, computer = false.
Position & Movement
3 min read Updated Dec 2025
Get player positions, teleport them, and apply physics forces.
api.getPosition()
Get the current position of a player or entity in the world. Returns an array of three numbers: [x, y, z] coordinates. Works on any entity, not just players.
js
let pos = api.getPosition(playerId);
// pos[0] = x, pos[1] = y (height), pos[2] = z
When to use
Zone detection, void death, distance calculations, saving spawn points.
Gets position array, sends coordinates to player. Returns true to prevent "unknown command" error.
Position is stored as 3 numbers in a list (called an array): X, Y, and Z coordinates.
X is left/right, Y is up/down (height!), and Z is forward/backward.
The tricky part: arrays start counting at 0, not 1. So pos[0] is the first number (X), pos[1] is the second (Y), and pos[2] is the third (Z).
Think of it like a list where the first item is #0, second is #1, third is #2.
api.setPosition()
Instantly teleport a player or entity to specific coordinates. The entity is moved immediately without any travel animation. Can accept coordinates as separate parameters or as an array.
js
api.setPosition(playerId, 0, 10, 0);
When to use
Spawn commands, teleporting to arenas, moving players between areas.
Teleports to (0, 10, 0). Y=10 is a safe height above ground.
This instantly moves a player to wherever you want - like a teleport command.
The format is: setPosition(playerId, X, Y, Z) where X, Y, Z are the coordinates you want them at.
In Bloxd, Y = 1 is the default ground level. Y = 10 is a safe spawn height above ground.
The player doesn't walk there - they just instantly appear at that spot!
api.applyImpulse()
Apply a physics force to push an entity in a direction. The force is added to the entity's current velocity, creating momentum-based movement. Takes X, Y, Z impulse values.
js
api.applyImpulse(playerId, 0, 20, 0);  // Launch up
api.applyImpulse(playerId, 10, 5, 0);  // Push forward + up
Applies upward force of 30. Player gets launched into the air.
This is different from teleporting! Instead of moving them instantly, you're PUSHING them like a shove or a jump pad.
The three numbers are how hard to push in each direction: (X push, Y push, Z push)
(0, 30, 0) means: don't push sideways (0), push UP really hard (30), don't push forward/back (0). Result: they fly straight up!
(10, 10, 0) would push them sideways AND up at the same time - like being launched at an angle.
Bigger numbers = stronger push. Negative numbers push the opposite way (so -10 on Y would push them DOWN).
api.getVelocity()
Get the current velocity of an entity - how fast it's moving in each direction. Returns [x, y, z] velocity values. Returns [0, 0, 0] if the entity doesn't have a physics body.
js
let vel = api.getVelocity(playerId);
// vel[0] = x speed, vel[1] = y speed, vel[2] = z speed
Velocity means how fast something is moving. This tells you the player's current speed in each direction.
If they're standing still, you get [0, 0, 0] - zero speed in all directions.
If they're falling, the Y velocity (vel[1]) will be a negative number because they're moving downward.
Useful for things like: checking if they're falling fast (fall damage), seeing if they're moving (AFK detection), or speed-based mechanics.
api.setVelocity()
Set the exact velocity of an entity, replacing its current movement. Unlike applyImpulse which adds force, this directly sets the speed and direction the entity is moving.
Commands to zoom the camera in or out for better views.
Think of zoom like how far back the camera sits from the player. Bigger number = camera further away = you see more of the world.
Default zoom is around 5-6. That's the normal third-person view.
Zoom 15 = way zoomed out, like a bird's eye view
Zoom 2 = super close, almost first-person
Great for vehicles (zoom out so you can see the whole vehicle).
api.getPlayerFacingInfo()
Get detailed information about where a player's camera is and what direction they're facing. Returns camera position, direction vector, angle direction, and movement heading.
js
let info = api.getPlayerFacingInfo(playerId);
// info.camPos = camera position [x, y, z]
// info.dir = direction vector [x, y, z]
// info.angleDir = angle direction
// info.moveHeading = movement heading
When to use
Detecting what direction player is aiming.
This tells you everything about where the player is looking and facing.
camPos is where their camera (eyes) are in the world - useful for spawning things from their viewpoint.
dir is the direction they're looking as a vector - where their crosshair points.
Perfect for shooting games - you need to know where their camera is and what direction they're aiming!
api.getPlayerTargetInfo()
Get information about the block the player is looking at. Returns the block position, the face they're looking at (normal), and where a block would be placed (adjacent).
js
let target = api.getPlayerTargetInfo(playerId);
// target.position = block they're looking at [x, y, z]
// target.normal = which face of the block
// target.adjacent = where a block would be placed
Example: What are you looking at?
js
playerCommand = (playerId, command) => {
    if (command === "whatblock") {
        let target = api.getPlayerTargetInfo(playerId);
        let blockName = api.getBlock(target.position);
        api.sendMessage(playerId, "You're looking at: " + blockName);
        return true;
    }
}
Gets the block position they're targeting, then checks what block type it is.
This is like asking "what block is your crosshair pointing at?"
position gives you the coordinates of that block.
normal tells you which face of the block you're looking at (top, bottom, side).
adjacent is where a new block would appear if you placed one - the empty space next to the block you're targeting.
Super useful for custom building mechanics or interaction systems!
api.isPlayerCrouching()
Check if a player is currently crouching (sneaking). Returns true if crouching, false if standing normally.
js
if (api.isPlayerCrouching(playerId)) {
    api.sendMessage(playerId, "You're sneaking!");
}
When to use
Stealth mechanics, special crouch abilities, hiding systems.
Example: Stealth mode
js
tick = (ms) => {
    let players = api.getPlayerIds();
    for (let p of players) {
        if (api.isPlayerCrouching(p)) {
            api.setPlayerOpacity(p, 0.3);
        } else {
            api.setPlayerOpacity(p, 1);
        }
    }
}
Makes crouching players semi-transparent for stealth gameplay.
Crouching (also called sneaking) is when players hold the crouch button. They move slower and their character gets shorter.
This function just checks: "Is this player currently holding crouch?" Yes = true, No = false.
You can use this for stealth games (crouching makes you harder to see), special abilities (crouch to activate something), or movement mechanics (crouch to fit through small spaces).
Player Appearance
3 min read Updated Dec 2025
Change how players look - make them invisible, change their skin, adjust their size, or set their pose.
api.setPlayerOpacity()
Change a player's transparency level. 1 is fully visible (normal), 0 is completely invisible. Values between 0 and 1 make them semi-transparent.
Makes the player's head 3 times bigger in all directions.
This lets you stretch or shrink individual body parts. Each part has three scale values: [X, Y, Z].
[2, 2, 2] = double the size in all directions (twice as big)
[0.5, 0.5, 0.5] = half the size in all directions (tiny)
[1, 2, 1] = normal width, double height, normal depth (stretched tall)
IMPORTANT: You must pass ALL the parts you want scaled at once! If you call this function again, it forgets previous scales. So if you want a big head AND long arms, put both in the same call.
The body part names must be spelled exactly right with capitals!
Health & Combat
3 min read Updated Dec 2025
Manage player health, heal them, and handle respawning.
api.getHealth()
Get the current health value of a player or entity. Returns a number from 0 (dead) to 100 (full health). Works on any entity with health.
js
let health = api.getHealth(playerId);
When to use
Health displays, low health warnings, health-based game mechanics.
This gives you a number from 0 to 100 representing how much health the player has.
100 = full health, 0 = dead, 50 = half health.
Store it in a variable like let health = ... so you can check it or show it to the player.
api.setHealth()
Set the exact health value of an entity. If the new health exceeds their max health, you must pass increaseMaxHealthIfNeeded as true. Setting health to 0 kills the entity. Returns whether the change killed the entity.
js
api.setHealth(playerId, 100);  // Full heal
api.setHealth(playerId, 0);    // Kill player
When to use
Heal commands, damage zones, instant kill areas, health pickups.
Sets health to 100 (full). Green message confirms the heal.
This sets their health to an exact number - whatever you put in.
setHealth(playerId, 100) = full health, completely healed
setHealth(playerId, 0) = zero health, they die instantly
setHealth(playerId, 50) = half health
It doesn't matter what their health was before - it gets set to exactly what you specify.
api.applyHealthChange()
Change an entity's health by a specific amount. Positive values heal, negative values deal damage. Damage depletes shield first, then health. Returns whether the change killed the entity.
This is different from setHealth! Instead of setting health to an exact number, this ADDS or REMOVES from their current health.
Negative number = damage. -5 means "take away 5 health" (deal 5 damage).
Positive number = healing. 10 means "add 10 health" (heal them).
So if they have 15 health and you do applyHealthChange(playerId, -5), they end up with 10 health.
api.forceRespawn()
Instantly respawn a dead player, skipping the respawn screen. Optionally specify custom spawn coordinates as an array. Without coordinates, the player spawns at the default spawn point.
Normally when players die, they see a "Click to Respawn" screen. This skips that and brings them back to life instantly.
Without any location: forceRespawn(playerId) - they respawn at the world's default spawn point.
With a location: forceRespawn(playerId, [0, 10, 0]) - they respawn at those exact coordinates. Notice the square brackets around the coordinates!
Great for fast-paced games where you don't want players waiting on a death screen.
api.isAlive()
Check whether a lifeform is currently alive. Returns true if alive and playing, false if dead or on the respawn screen. Works on players and mobs.
js
if (api.isAlive(playerId)) {
    api.sendMessage(playerId, "You're alive!");
}
This returns true if the player is alive and playing, or false if they're dead (on the respawn screen).
Use it in an if statement to only do something when they're alive - like you can't heal a dead player!
Useful for checking before doing things that only make sense for living players.
api.kickPlayer()
Forcibly disconnect a player from the world. The player is removed from the game and shown the reason message. They can rejoin unless banned.
js
api.kickPlayer(playerId, "You have been kicked");
When to use
Admin commands, anti-cheat, rule enforcement.
This completely removes someone from your world - they get disconnected and have to rejoin if they want to come back.
The text in quotes is the reason they'll see when they get kicked, like "You have been kicked for cheating".
Use this for admin commands (like /kick PlayerName) or automatic systems that detect rule-breaking.
Be careful with this power! Only use it when really needed.
onPlayerKilledOtherPlayer
Event that fires when a player kills another player.
Example: Kill announcements
js
onPlayerKilledOtherPlayer = (attackingPlayer, killedPlayer, damageDealt, withItem) => {
    let killer = api.getEntityName(attackingPlayer);
    let victim = api.getEntityName(killedPlayer);
    api.broadcastMessage(killer + " killed " + victim + " with " + withItem);
}
Gets both names and the weapon used, broadcasts the kill to everyone.
This is an EVENT, not a function you call. It runs automatically whenever one player kills another.
The game gives you four pieces of info:
attackingPlayer - who did the killing
killedPlayer - who died
damageDealt - how much damage the final hit did
withItem - what weapon/item was used (like "Diamond Sword")
You can use this for kill feeds, tracking scores, weapon-specific bonuses, or anything that should happen when someone gets a kill.
api.getCurrentKillstreak()
Get the number of consecutive kills a player has achieved without dying. Returns an integer representing their current killstreak count. Automatically tracked by the game.
js
let streak = api.getCurrentKillstreak(playerId);
A killstreak is how many kills someone has gotten in a row without dying. The game tracks this automatically for you!
This returns a number - if they've killed 5 people without dying, it returns 5.
Use it for announcements like "Steve is on a 5 killstreak!" or rewards for high streaks.
api.clearKillstreak()
Reset a player's killstreak counter back to zero. Normally happens automatically when they die, but you can manually reset it for game mechanics or penalties.
js
api.clearKillstreak(playerId);
This resets their killstreak back to 0, like they just started fresh.
Normally the game resets it when they die, but you might want to reset it manually - like when a new round starts, or as a penalty for something.
Inventory
4 min read Updated Dec 2025
Give items to players, check what they have, and manage their inventory.
api.giveItem()
Add items to a player's inventory by name and quantity. Item names must match exactly (case-sensitive). Returns the actual amount added. Optionally accepts item attributes for special items like guns with ammo.
Check whether a player has at least one of a specific item in their inventory. Returns true if they have it, false if they don't. Doesn't tell you how many they have.
js
if (api.hasItem(playerId, "Diamond Sword")) {
    api.sendMessage(playerId, "Nice sword!");
}
When to use
Item requirements, access control, quest checks.
This is a yes/no question: "Does this player have at least one of this item?"
Returns true (yes they have it) or false (no they don't).
Use it in an if statement to check before doing something - like "only let them in the VIP area if they have a VIP Pass".
Note: This only tells you IF they have it, not HOW MANY. Use getInventoryItemAmount if you need to know the quantity.
api.getInventoryItemAmount()
Get the exact quantity of a specific item in a player's inventory. Returns 0 if they have none, or a negative number if they have infinite. Perfect for currency and resource tracking.
js
let apples = api.getInventoryItemAmount(playerId, "Apple");
playerCommand = (playerId, command) => {
    if (command === "coins") {
        let coins = api.getInventoryItemAmount(playerId, "Gold Coin");
        api.sendMessage(playerId, "You have " + coins + " coins");
        return true;
    }
}
Counts Gold Coins and displays the amount.
This returns a NUMBER - exactly how many of that item they have in their inventory.
If they have 50 apples, it returns 50. If they have none, it returns 0.
Perfect for money/currency systems! Use "Gold Coin" as your game's money, then check how many coins they have before letting them buy things.
You can compare it with numbers: if (coins >= 10) checks if they have 10 or more coins.
api.removeItemName()
Remove a specific quantity of an item from a player's inventory by name. Always check if they have enough before removing to avoid errors. Used for shop purchases and crafting costs.
IMPORTANT: Always check if they have enough BEFORE removing! The shop example shows the right pattern:
1. First, check how many they have
2. If they have enough, THEN remove the items and give them what they bought
3. If they don't have enough, tell them they need more
Don't remove first then check - that's backwards and will cause problems!
api.clearInventory()
Completely empty a player's inventory, removing all items. Use carefully as this cannot be undone. Good for game resets or arena starts where everyone needs a fresh inventory.
js
api.clearInventory(playerId);
When to use
Game resets, death penalties, arena starts.
This wipes their entire inventory clean - EVERYTHING is gone. Use carefully!
Good for: starting a new game round where everyone should begin fresh, entering an arena with specific loadouts, or as a punishment.
Often you'll want to use this together with giveItem - clear everything, then give them the items they should start with.
api.getHeldItem()
Get the item currently selected in the player's hotbar. Returns an object with item name, amount, and attributes, or null if holding nothing. Check for null before accessing properties.
js
let held = api.getHeldItem(playerId);
if (held) {
    api.sendMessage(playerId, "Holding: " + held.name);
}
When to use
Special item abilities, weapon detection, tool checks.
This tells you what item is in their hand right now - the one they have selected in their hotbar.
It returns an object with information about the item. Use held.name to get the item's name.
If they're holding nothing (empty hand), it returns null. That's why we check if (held) first - to make sure they're actually holding something before trying to use it!
Useful for: special abilities when holding certain items, checking if they have the right tool, weapon-specific effects.
api.setSelectedInventorySlotI()
Force the player to select a specific hotbar slot (0-9). Slot 0 is the first slot, slot 9 is the last. Useful for forcing players to hold specific items or switching weapons automatically.
js
api.setSelectedInventorySlotI(playerId, 0); // Select first slot
The hotbar is the row of item slots at the bottom of the screen (10 slots total).
This forces the player to switch to a specific slot - like pressing the number keys 0-9.
Slots are numbered 0-9. So slot 0 is the first slot, slot 9 is the last slot.
Useful for: forcing them to hold a specific item, switching their weapon automatically, or game mechanics that require holding certain items.
Basic Blocks
3 min read Updated Dec 2025
Get and set blocks in the world - the foundation of building and world manipulation.
api.getBlock()
Get the name of a block at specific coordinates. Returns the block type as a string like "Stone", "Dirt", or "Air" if empty.
js
let block = api.getBlock(10, 5, 10);
api.broadcastMessage("Block at 10,5,10 is: " + block);
When to use
Checking what block a player is standing on, detecting specific blocks, scanning areas.
Example: Check block below player
js
playerCommand = (playerId, command) => {
    if (command === "checkbelow") {
        let pos = api.getPosition(playerId);
        let blockBelow = api.getBlock(pos[0], pos[1] - 1, pos[2]);
        api.sendMessage(playerId, "Standing on: " + blockBelow);
        return true;
    }
}
Gets player position, checks the block 1 unit below them (Y - 1).
Every position in the world has a block - even if it's just "Air" (empty space).
The three numbers are X, Y, Z coordinates. Y is height - so Y-1 means one block below.
This returns a string with the block name like "Stone", "Grass", "Wood", etc.
You can also pass coordinates as an array: api.getBlock([10, 5, 10])
api.setBlock()
Place or change a block at specific coordinates. Instantly sets the block type without any animation or drops.
Building floors, clearing areas, creating solid structures, filling spaces.
Example: Create platform
js
playerCommand = (playerId, command) => {
    if (command === "makeplatform") {
        let pos = api.getPosition(playerId);
        let x = pos[0];
        let y = pos[1] - 1;
        let z = pos[2];

        api.setBlockRect([x - 5, y, z - 5], [x + 5, y, z + 5], "Stone");
        api.sendMessage(playerId, "Platform created!");
        return true;
    }
}
Creates a 10x10 stone platform centered below the player.
This fills a 3D box with blocks. You give it two corners and it fills everything between them.
Last two parameters: hasFloor (boolean), hasCeiling (boolean)
When to use
Building rooms, houses, arenas, enclosed spaces.
Example: Create room
js
playerCommand = (playerId, command) => {
    if (command === "makeroom") {
        let pos = api.getPosition(playerId);
        let x = pos[0];
        let y = pos[1];
        let z = pos[2];

        // Create walls with floor and ceiling
        api.setBlockWalls([x - 5, y, z - 5], [x + 5, y + 5, z + 5], "Stone", true, true);
        api.sendMessage(playerId, "Room created!");
        return true;
    }
}
Creates a hollow stone room around the player with floor and ceiling.
This creates the WALLS of a box, not a solid cube. The inside is hollow/empty.
hasFloor: false, hasCeiling: false = just the 4 walls, no floor or ceiling
Perfect for making buildings since you don't waste blocks filling the inside!
Example: Arena walls only
js
playerCommand = (playerId, command) => {
    if (command === "arena") {
        let pos = api.getPosition(playerId);
        let x = pos[0];
        let y = pos[1];
        let z = pos[2];

        // Create walls without floor or ceiling
        api.setBlockWalls([x - 10, y, z - 10], [x + 10, y + 5, z + 10], "Stone", false, false);
        api.broadcastMessage("Arena walls created!");
        return true;
    }
}
Creates 20x20 stone walls around the player, 5 blocks tall, no floor or ceiling.
Block Permissions
4 min read Updated Dec 2025
Control which blocks players can break or place - protect spawn areas, create safe zones, or restrict certain block types.
api.setCantChangeBlock()
Prevent a player from breaking or placing a block at a specific position. The block becomes protected for that player only.
js
api.setCantChangeBlock(playerId, 0, 10, 0);
When to use
Protecting specific blocks, spawn protection, preventing griefing.
Example: Protect spawn area
js
onPlayerJoin = (playerId) => {
    // Protect 10x10x10 cube around spawn
    for (let x = -5; x <= 5; x++) {
        for (let y = 0; y <= 10; y++) {
            for (let z = -5; z <= 5; z++) {
                api.setCantChangeBlock(playerId, x, y, z);
            }
        }
    }
    api.sendMessage(playerId, "Spawn is protected!");
}
Loops through X, Y, and Z coordinates to protect a 10x10x10 cube at spawn.
This makes ONE specific block unbreakable/unplaceable for ONE specific player.
Format: setCantChangeBlock(playerId, x, y, z)
The player can't break it if it exists, and can't place a block there if it's air.
This is per-player - other players can still change that block unless you protect it for them too.
Warning: Protecting thousands of individual blocks can cause lag. Use setCantChangeBlockType or setCantChangeBlockRect for large areas.
api.setCanChangeBlock()
Allow a player to change a specific block, overriding other restrictions. Useful when canChange client option is false.
js
api.setCanChangeBlock(playerId, 10, 5, 10);
This is the opposite of setCantChangeBlock - it ALLOWS changing a specific block.
Useful when you've disabled building globally but want to allow specific blocks to be changed.
Example: Building disabled everywhere except in designated build zones.
api.setCantChangeBlockType()
Prevent a player from breaking or placing a specific block type anywhere in the world. Affects all blocks of that type.
Example: setDefaultMobSetting("Draugr Zombie", "walkingSpeedMultiplier", 2.0) makes ALL future Draugr Zombies twice as fast.
This does NOT affect mobs that are already spawned - only new ones.
Great for difficulty modes or making all mobs of a type behave differently.
api.getDefaultMobSetting()
Get the current default value for a mob type's setting.
js
let defaultSpeed = api.getDefaultMobSetting("Draugr Zombie", "walkingSpeedMultiplier");
This reads what the default setting is for a mob type.
Useful for checking current defaults or resetting to original values.
Returns the default value that new mobs of that type will have.
Example: Peaceful sheep
js
// Make all sheep peaceful
api.setDefaultMobSetting("Sheep", "attackDamage", 0);
api.setDefaultMobSetting("Sheep", "attackRadius", 0);

// Spawn some sheep
for (let i = 0; i < 5; i++) {
    api.attemptSpawnMob("Sheep", i * 5, 10, 0);
}
Sets default so sheep can't attack, then spawns 5 peaceful sheep.


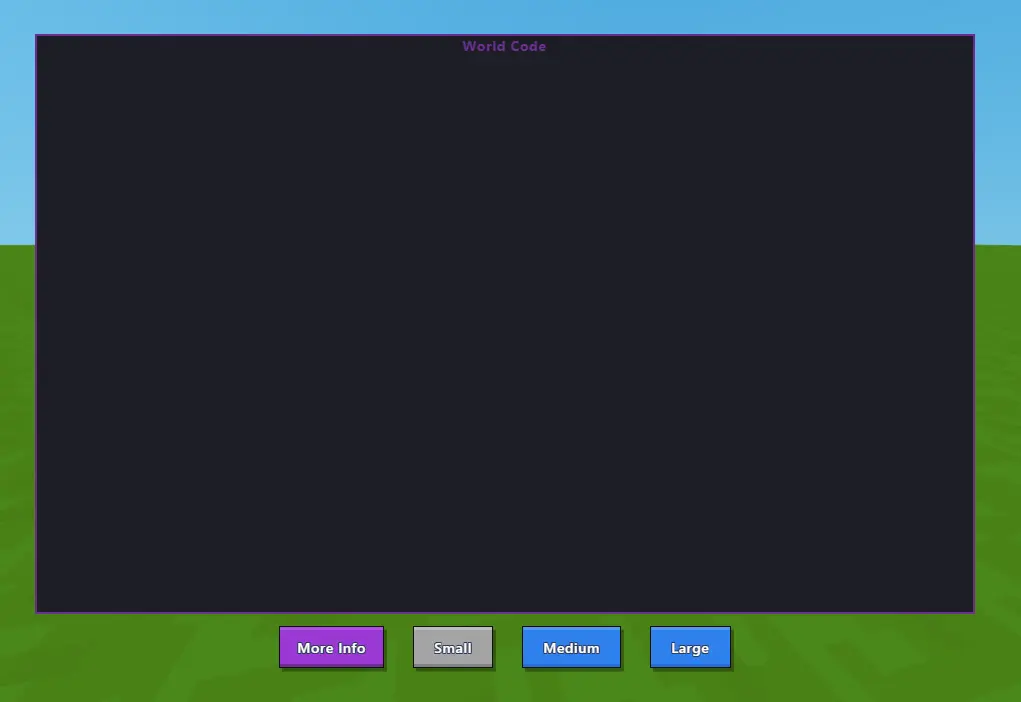 The World Code editor popup (opened with F8)
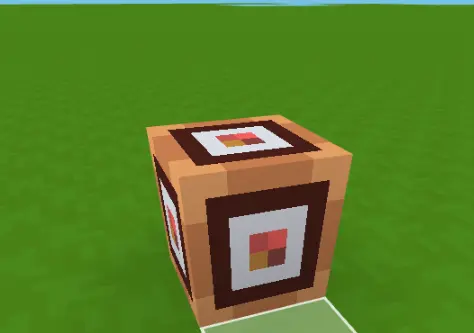 A Code Block placed in the world
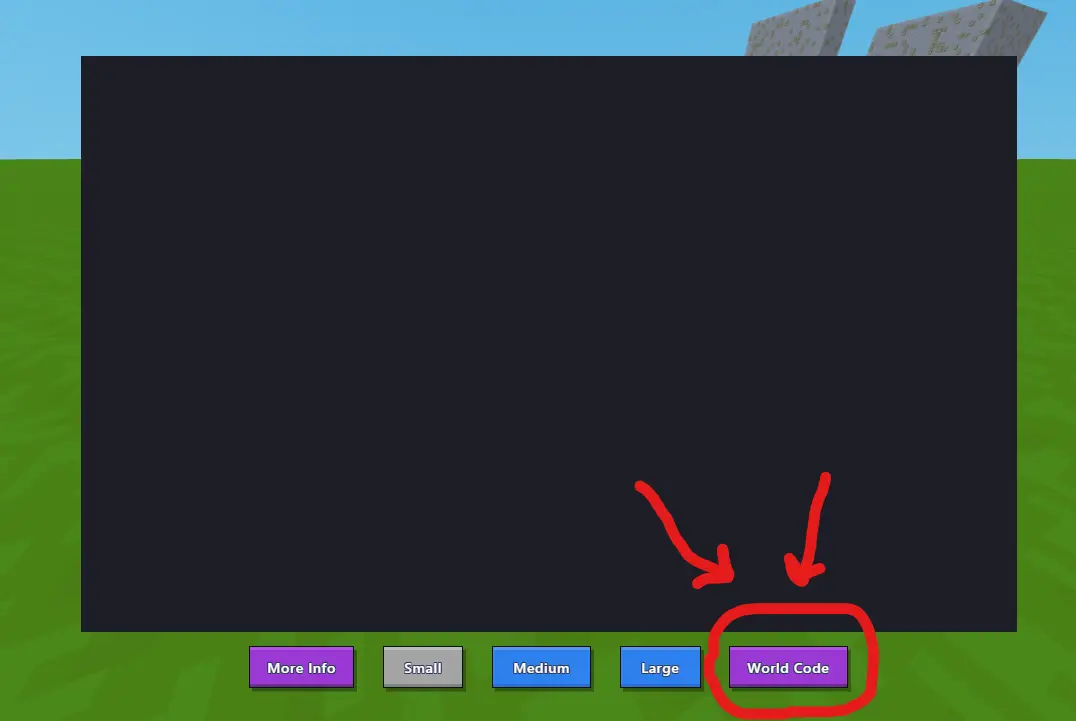 The Code Block editor - red arrows show the World Code button